|
The Underground Layout
On the 2nd of March 1999, the FOX Television Network
broadcast a programme entitled 'Opening The Lost Tombs: Live From
Egypt.' The closing section of the programme dealt with the 'Tomb of
Osiris', the location described in these pages. Here was an
opportunity for the man in charge of the excavations to end the
speculation about what lies beneath Khafre's causeway.
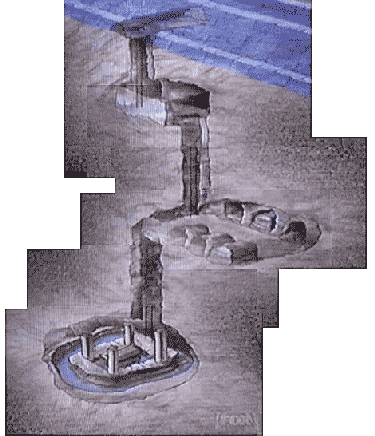 This
graphic of the shafts and chambers under the causeway is taken from
the FOX TV Special "Opening The Lost Tombs" which was transmitted on
the 2nd of March 1999. It has been compiled from a number of video
frame captures. It must be immediately pointed out that this graphic
does not show the true layout under the causeway. This
graphic of the shafts and chambers under the causeway is taken from
the FOX TV Special "Opening The Lost Tombs" which was transmitted on
the 2nd of March 1999. It has been compiled from a number of video
frame captures. It must be immediately pointed out that this graphic
does not show the true layout under the causeway.
For the purposes of this discussion, we shall assume that the
causeway as shown is orientated east/west although the real layout
is slightly off this axis. Khafre's pyramid is to the left (west),
and the Sphinx is to the right (east).
The layout implies that the first and second chambers lie on an
east/west axis and that the connecting shaft descends from the first
chamber's east side to the second chamber's west side. The shaft to
the third chamber is shown descending from a sidechamber in the
south wall. It enters the chamber - the 'Tomb of Osiris' on its
north side. This chamber is shown on a north/south axis and extends
south, away from the causeway.
To visualise the actual layout of the complex, rotate the third
chamber through 180 degrees so that it extends under the second
chamber rather than away from it. Now using the first shaft as an
axle, rotate the entire underground complex 90 degrees
anticlockwise, so that the first and second chambers are aligned
with and under the subway rather than the causeway, and the third
chamber is aligned with and under the causeway rather than the
subway. Do not mentally rotate the subway and the causeway.
Overhead Plans
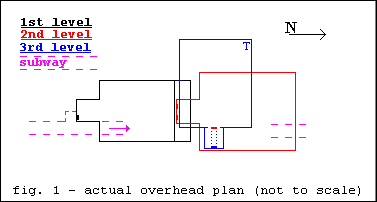
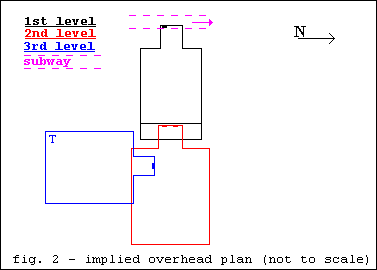
The two figures on the right
represent overhead plans of the chamber layout, i.e. you are above
the causeway and looking straight down through the chambers. Figure
1 shows the actual layout. Figure 2 shows the layout as suggested by
the graphic depicted above. Ladders are shown on the plans as
blocks.


With reference to figure 1, the first
and second chambers lie on a north/south axis. The first shaft
descends from the southern end of the subway. A ladder is affixed to
the south side of the shaft. Stepping from the ladder, one would
turn and walk north, entering the first chamber on its south side.
The second shaft descends from the chamber's north side and enters
the second chamber on its south side. The first and second chamber
interiors in the above graphic are representative depictions of the
actual layouts although (with reference to the correct orientation)
the shaft descending to the third level occupies the southernmost of
the three sidechambers on the east side.
The third chamber lies on an east/west axis, the shaft entering on
the east side. The sarcophagus (not shown) is also orientated on an
east/west axis. The entrance to the unexcavated tunnel in which
Doctor Hawass stood is located in the north west corner of the
chamber (T).
The layout shown in figure 2 is discussed in the section 'The
Underground Layout'.
Go Back
|
 This
graphic of the shafts and chambers under the causeway is taken from
the FOX TV Special "Opening The Lost Tombs" which was transmitted on
the 2nd of March 1999. It has been compiled from a number of video
frame captures. It must be immediately pointed out that this graphic
does not show the true layout under the causeway.